Table of Contents
ToggleLast Updated on March 9, 2024
Are you running a WordPress site? If so, you know how important it is to keep your site fast and free of errors. A website that loads slowly is not only frustrating for users, but it’s also bad for business.
Sites with a slow load time lose visitors and can have a negative impact on revenue. Thankfully, there are plenty of ways to speed up your WordPress website. One of the simplest ways to speed up your site with wp super cache plugin.
- Do you use WordPress caching?
- Do you know how to configure the WP Super Cache plugin for better performance?
WP Super Cache is a plugin aimed at optimizing the load time of WordPress pages. It creates copies that do not need to be loaded from the database, making the process much more agile and lightening the work of the server.
WordPress plugins are fundamental tools at any level of platform usage. In practice, they can help optimize and monitor page performance, automate Marketing tasks, among other features.
Among the selection of basic plugins, WP Super Cache should be seen as one of the main ones in terms of better performance. The routine of managing a WordPress site is full of tweaks, changes, updates, and configurations that ensure it is perfect for users to visit.
It turns out that, throughout this process, installing plugins and making changes can make it heavier, consuming a lot of the server. Slow access ends up as a bad consequence!
Considering the importance of keeping websites agile and with an acceptable load time, using tools such as WP Super Cache is essential!
In this post, we’ll talk more about this plugin and its role in making websites faster! Below, we’ll take you through every setting and action you need to take to properly speed up your WordPress site with WP Super Cache.
What is WP Super Cache?
WP Super Cache is a WordPress plugin aimed at cleaning the cache of websites, ensuring that their loading time is reduced. This tool allows you to optimize the access experience and, therefore, works differently, generating a better relationship between servers and pages at loading time.
Installing plugins, for example, is an activity that can overload websites’ caches, and this directly impacts load times. Every time a user tries to enter the site, the server response time is much less than ideal, precisely because of the volume of files that changes, adjustments, and plugins generate for the different pages.
As plugins are essential for managing and optimizing websites, it’s virtually impossible to survive on WordPress without them. Given this need, the role of WP Super Cache is to reduce this side effect of overloading that is implied in the pages.
Benefits of using a Caching Plugin in WordPress
WordPress caching plugins offer various functions to improve the response time of websites. The most important functions to speed up your WordPress site are:
- Combine files: Often a website uses multiple CSS and JS files. Each file requires a separate request. To reduce the number of requests, the plugin combines the different CSS and JS files into one.
- Caching in the browser: when a user goes to a page, the plugin drops a copy of the resources. By visiting this page again, the resources will be downloaded directly from the cache.
- GZip Compression: With GZip, the WordPress caching plugin reduces the size of HTML, CSS, and JS files.
- CDN (Content Delivery Network): a CDN allows data to be delivered more quickly.
- Image optimization: heavy images or a large number of images can often slow down the loading time of a website. Optimizing the size of the images significantly improves its performance.
The performance of WP Super Cache
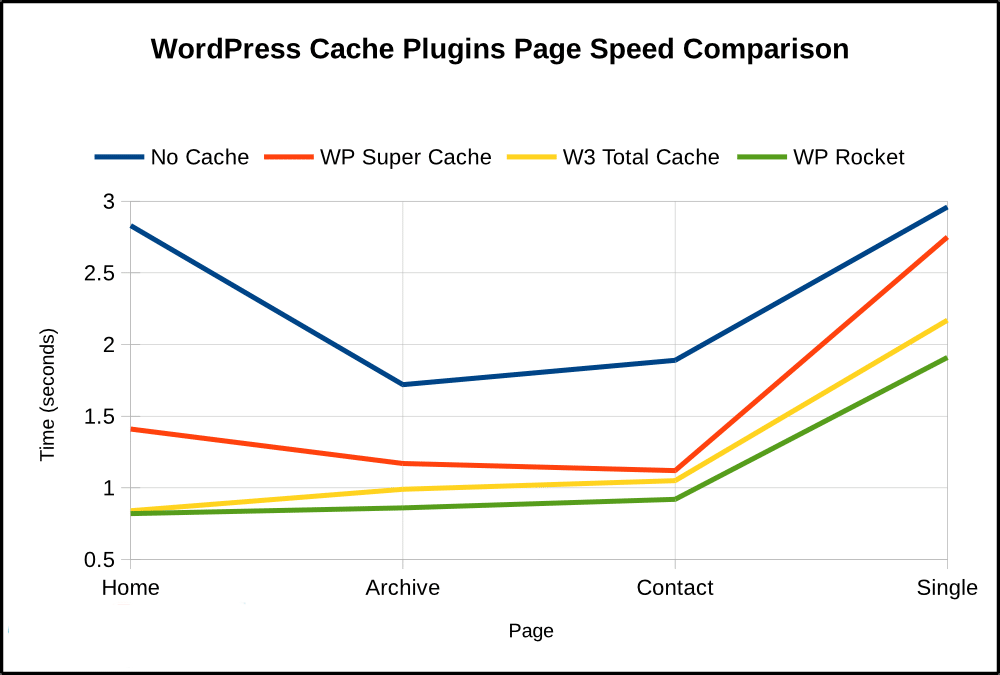
The plugin creates copies of all pages on the site, making the server when loading them, read these generated files, instead of the originals. By not having to directly load database pages, servers can perform faster processing from these copies.
This greatly reduces time by taking advantage of lighter files. When viewing the user, nothing changes. It still has full access to the sites, with no elements missing — but faster load time.
The possibility of dispensing with this access to the database that WP Super Cache generates is very advantageous since there is no volume of large files to be uploaded, as the copies are “clean”.
It is important to note that these copies will have the accumulation of cache information, but not often, which happens in the original versions which overload the database. Thus, information is only added when new posts are made from WordPress or when there are structural changes to the site — not just simple tweaks.
The impact for websites
One of the most important points of using the WP Super Cache plugin to increased website speed. it allows for these pages, mainly due to its fast loading. The ability to open quickly for visitors is one of Google’s ranking parameters.
That is, if you can achieve this, your website will be more easily on the first pages of results.
WP Super Cache – Installation and Overview
The installation of WP Super Cache is the first step in the process, which also extends to configuration, a step that ensures proper functioning. So, assuming you’re already a frequent WordPress user, follow this simplified walkthrough!
Search the plugin
On your WordPress dashboard, go to the plugins tab and type in the name of the tool.
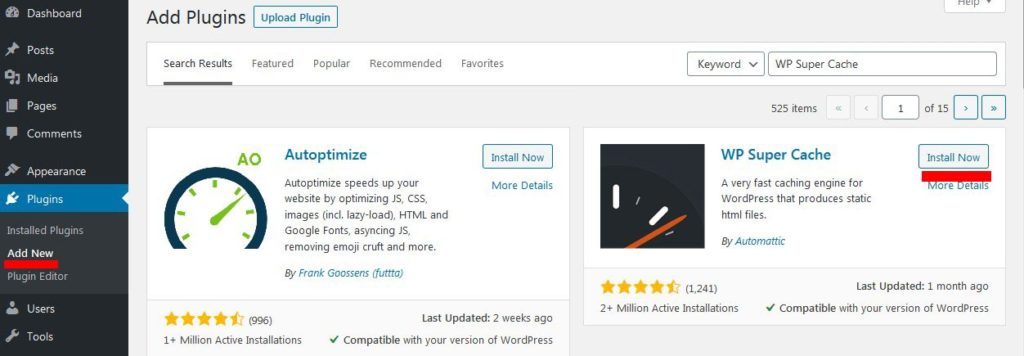
Once you find the plugin, just click “Install Now” and then “Activate”.
How to configure WP Super Cache?
After installation, the most complex step is configuring WP Super Cache. There are several levels of adjustments that need to be made so that the functioning of this plugin is, in addition to being effective, complete. Below, see each of the levels of adjustments that need to be made!
WP Super Cache Easy
To start the process, you must access the plugins tab and, when clicking on the WP Super Cache option, you will find the settings link. When opened, there will be several tabs that will allow different levels of configuration. They are Easy, Advanced, Preload, CDN, and notifications.
Starting with the configuration, just access this option and check the box “Caching on (Recommended)”.
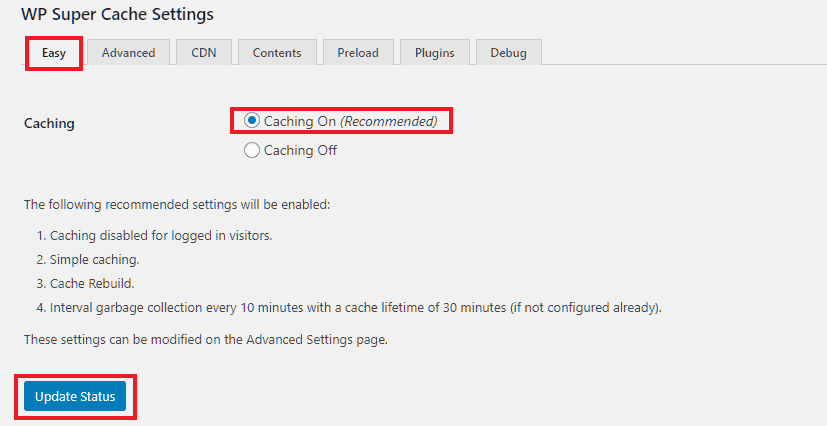
After performing this step, the plugin activity will be activated, in theory, generating a copy of the pages, as explained. Now, to make sure that it works properly, it is necessary to run a test, an option that will be below.
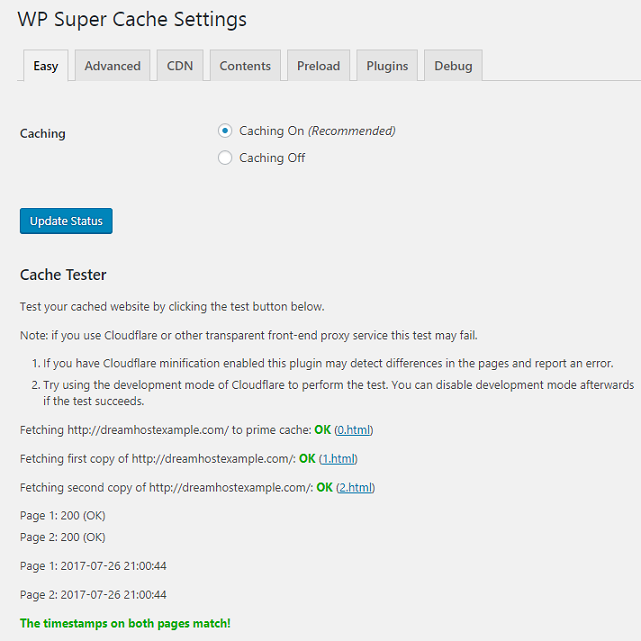
Just click on “Test Cache” and the process will be done automatically. You will receive a confirmation message about the functioning of the active plugin.
WP Super Cache Advanced
The advanced configuration options serve to maximize the entire performance of the WP Super Cache. As complex, we will explain below how to perform them and the performance returns of each change made.
To start, this time, it is necessary to access the “Advanced” tab in the plugin’s settings interface, as we have already guided. Soon, you will see a window where you should check the option “Expert”.

This choice is aimed at further intervention in the plugin’s functioning, which will result in maximum loading speed. After selecting this option, you will be faced with two lists of tagging options, the first one being called Miscellaneous.
It will have eight items, which you must leave, marked or unmarked, like this:
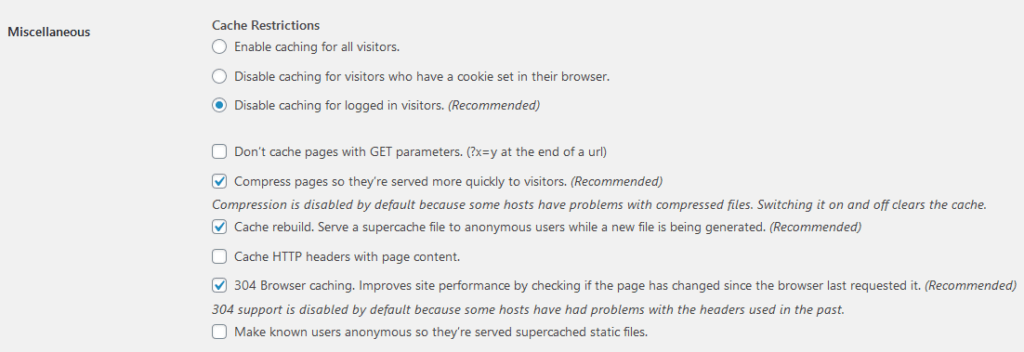
So that you understand what each one means, following the numbering marked in the image:
- remove cache option for frequent users on pages;
- removes GET Parameters as they need to be updated all the time, generating more cache volume. When checked, the option prevents this;
- reduces pages before they are sent to the cache, generating less volume;
- HTTP header is sent along with the cache;
- delivers old cache to anonymous users, allowing WP Super Cache to refresh cache and keep pages faster;
- points out when cached pages have not been modified since the administrator’s last request;
- check only if your site does not use comments. It makes users receive only cached pages;
- your site starts to inform you that it is optimized by WP Super Cache, with a message in the footer.
The second list of options is Advanced, also with more items.
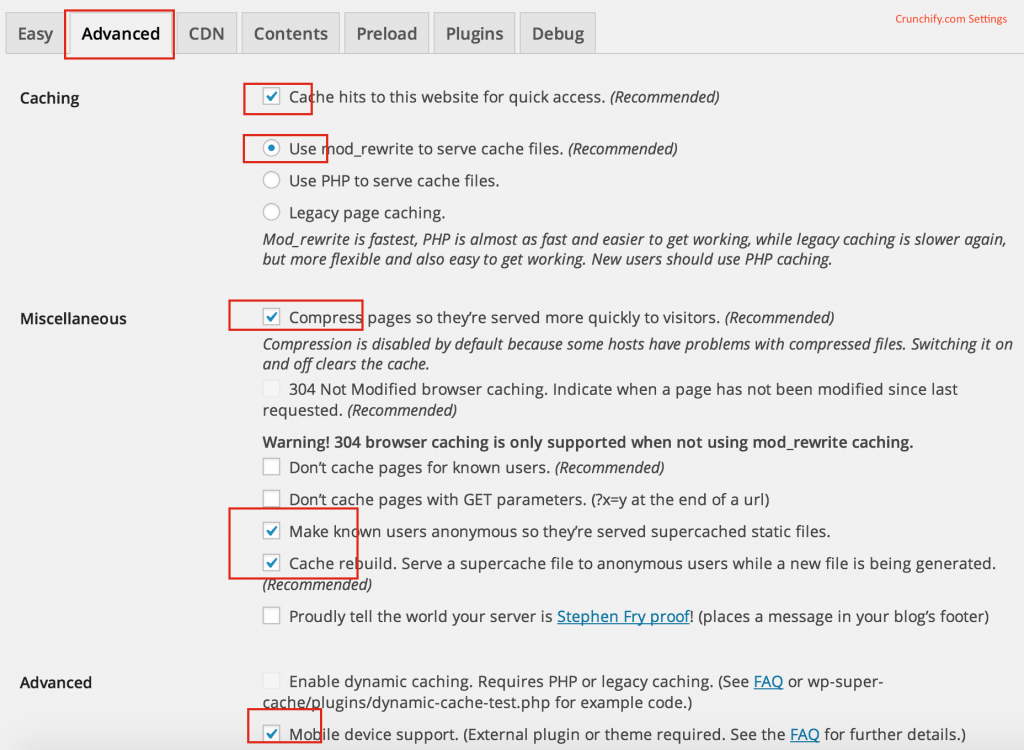
In this list, you find nine options and they mean:
- dynamic data is now stored on your website, that is, only first-time visitors will need to load the page from the server;
- enable cached pages for access from mobile devices;
- removing the UTF8 Charset file removes extraneous characters from the site, which can lead to overhead;
- clears the site cache with every new post and update made by the administrator;
- enables frequent checking on homepage cache update, ensuring that page copies are always optimized;
- deletes caches after comments and generates new and updated ones;
- lists all cached pages to improve admin view;
- activate only if your site receives a lot of simultaneous visits, otherwise leave unchecked;
- optimizes the display of cached files, doing this as soon as WordPress is launched.
WP Super Cache Preload
In this configuration option, the proposal is that the WP Super Cache allows storing all posts on the site in the cache. Static pages will be generated to run every time a non-recurring visitor visits your site.
Called caching, this activity will create a veritable compilation of your posts, starting with the newest and going to the oldest. If your hosting is shared, it’s important to limit this caching, allowing it to only consider the newest ones, especially if you have more than 10,000 posts.
This is the list of Preload settings:
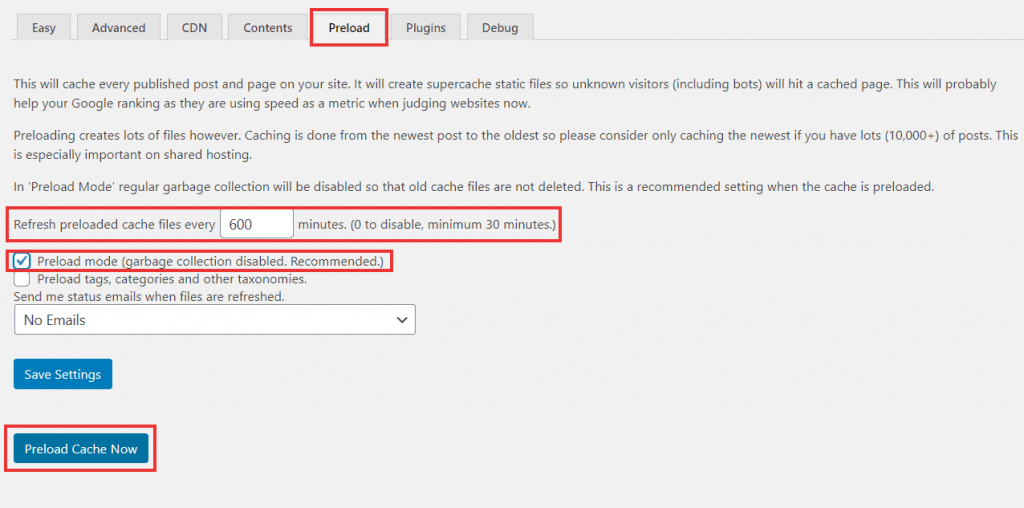
The list with the appropriate options and settings is as follows:
- Refresh Preload Cache: change to 720 minutes;
- Preload All Posts: select the number of posts you want to cache, as explained;
- Preload Mode: check for posts to be generated in copies;
- Preload Tags: check to send categories of posts to cache;
- Send Me Status: Set when to receive email notifications every time preload caches are updated.
- After configuring everything, click on “Update Settings”.
WP Super Cache CDN
This is the configuration part of the CDN. It is essential for those who use the service and want to have maximum performance in this caching activity. The list of options to be shown is this:
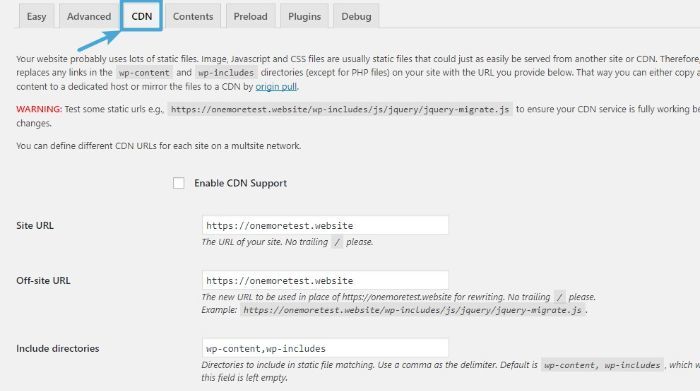
The settings for each option:
- Enable CDN Support: Enables CDN settings and guarantees all changes;
- OffSite URL: Enter the CDN URL with “HTTPS://.”HTTP ://.”
- Include Directories: option to include directories in CDN files. Add the “wp-content” and “wp-includes”.
- Exclude if Substring: configure which files will not be sent in static copies of the CDN. Add whatever you want according to the writing pattern shown in the image;
- Additional CNAMES: Add the desired CNAMES to make media available from websites, JavaScript, etc;
- Skip HTTPS URLs to Avoid “Mixed Content” Errors: If you use SSL, enable this option to avoid errors when creating static copies.
WP Super Cache notifications
Several important notifications should be enabled, improving the level of monitoring administrators have on their pages. Go to “plugins” in the WordPress dashboard and click on the “plugin admin page” link. From there, you will be taken to the other configuration options.
Mod Rewrite Rules
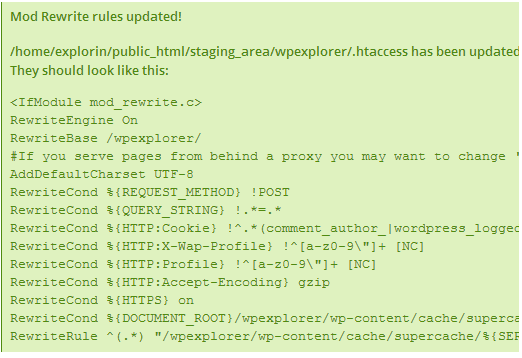
In this section, you have to update the Mod_Rewrite rules so that the changes are automatically saved in the .htaccess file and the information is served without the need to run PHP.
Once you click on “Update Mod_Rewrite rules“, the .htaccess file is updated with the new rules and it will show you a green window very similar to the one shown below:
Expiration time and garbage collection
Yes, the section name is not entirely palatable, but we have to continue configuring WP Super Cache. Less remains!
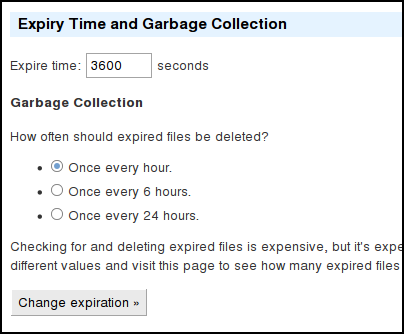
Through this section you will be able to set the duration of the cache, that is, the maximum time you want to serve a cached version to a user. The longer a page caches the better, but beware!
For user experience reasons, you cannot always deliver a cached version. WordPress indicates that about 3600 seconds is a good figure.
If in the advanced settings you have already selected that new cache files are created for updates, new publications or comments, this figure may be even higher. Also, your posting rate or comment frequency can help you figure out when you want those cache versions to expire.
In addition, you can schedule when you want the cache files to be removed and even notify you by email when they have done so.
If you make modifications in this section, click “Change expiration” to save changes.
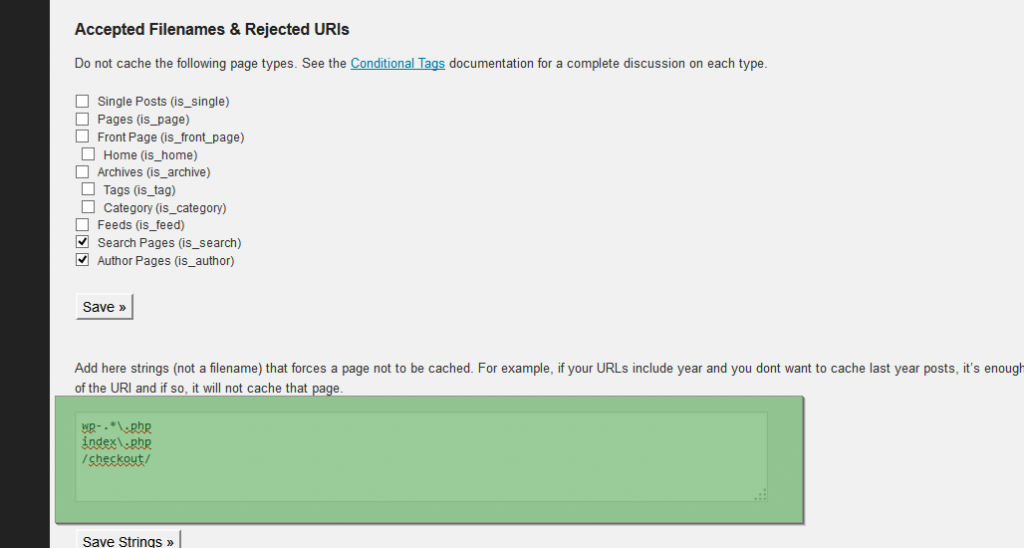
Accepted file names and rejected URLs
If you don’t want certain content to be cached, now is the time to do it. For example, if you have a constantly changing page like a forum or social media feed, turn it on.
Rejected User Agents
In this section, you can establish which users or bots you do not want to receive the cached versions of your website. It can be a good option for websites that have a different version for a certain browser or, for example, for mobile phones. By default, WordPress already includes the most important ones.
Confinement mode
This option should only be enabled if you expect to have a very high peak of traffic in any entry on your blog. What it will do is not refresh the cache against updates caused by comments, for example. So, for now, it is deactivated.
Cache content
Actually, in this tab, you will not have to make any configuration. It is a panel that shows you all the content currently cached, when it was generated for the last time and what is pending to be eliminated.
It can be useful if you make an update and want the changes to be visible at the moment. In this case, click on “Clear cache” and on the option “Regenerate cache statistics” so that the data will be updated.
Plugins and Debugging
These are two options aimed at more advanced users and are unnecessary except in exceptional cases. Its function is to make adjustments to make very specific plugins compatible with WP Super Cache.
In addition, the plugin itself indicates that before any update of your cache plugin, the settings made will be lost, so we recommend that you leave the values that it shows by default.
How to optimize files and images in WP Super Cache?
This work depends directly on the use of another plugin, BWP Minify, which you download to your WordPress dashboard. Download and activate it normally, then go into your settings and mark all items in this image:
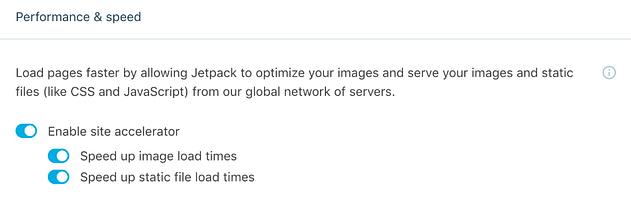
On this same page, you will find the “Minify Library Settings” category, in which you must select all the options from the image below, clicking on “Save Changes”, when finished:
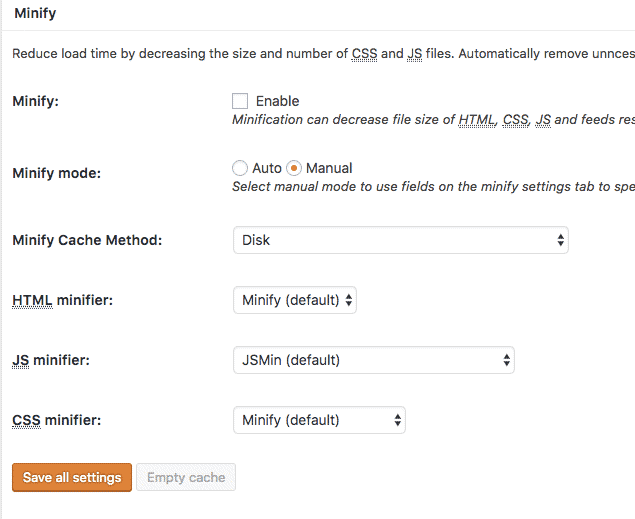
In the image optimization step, download the WP Smush plugin. It will do all the compression automatically. Once downloaded and installed, when you open it, you will find the option “Mass Compression”. Click “Bulk Smush Now”.
The process will take place normally, and in the end, your website will have files and images compressed and optimized for faster loading. This will help your performance, being a fundamental part of every process you’ve seen throughout this content.
Final Recommendations
WP Super Cache is, without a doubt, one of the most important plugins for those who manage websites and blogs on WordPress. As fundamental as they are, plugins generate the volume of files that can make the browsing experience slow and bad. After this caching process, everything can be developed in the best way!
We not only recommend it if you are going to install and configure WP Super Cache. Every time you go to make such a change to your website, be sure to make a full backup of your site. It can save you more of an upset if something doesn’t go as it should.
Any incompatibility with a plugin you already have may arise, an error occurs when configuring or simply that you have not taken our recommendations into account before installing a plugin and you want your website to return to its original state.
In addition to a good cache plugin for WP, it is necessary to take into account other basic aspects such as choosing a Hosting with SSD, optimizing images, or minimizing resources. Everything counts when it comes to having optimized WordPress! Contact HostAndProtect for information.
Further Reading:
- How to Fix Render-Blocking JavaScript and CSS in WordPress to Improve Site Speed?
- How To Secure Your cPanel Server For Better WordPress Security?
- WordPress Website Launch Checklist 2020 & An AIO Guide
- 15 Secure Web Hosting Best Practices To Keep Your Site Safe


